Tuesday, December 10, 2019

SAVE THE CARCASS!

While there are many tasks in the kitchen that I genuinely enjoy, my favorite one hands down is making stock.  Anytime I have leftover poultry carcasses (turkey from Thanksgiving, rotisserie chicken from the grocery store, leftover roasted chicken of whatever parts, duck, pheasant ... anything), I put the remains in ziplock bags and stash them in my freezer.  When I have the time, I use the foraged bones to make stock.  My culinary school textbook may offer an exact recipe for this, instructing one to use a mirepoix (50% onion; 25% carrot; 25% celery), with a fancy bouquet garnis (a mix of herbs, peppercorns, and whatever tied in cheesecloth), but I boldly say F&%$ that.  I use what I have in my fridge and to hell with the cheesecloth.  I have 2 carrots, an onion, some celery, half a bunch of parsley, some garlic, peppercorns, cloves, bay leaves, sage or thyme or whatever, a few mushrooms ... in the pot it goes.  Screw the ratios and fancy verbiage.  It's a matter of utilizing ingredients; waste not, want not.


My turkey this year was too big to fit the entire thing into my largest stock pot, so I cut it into pieces and did two batches.  Upon putting the carcass(es) in the pot (again this goes for any feathered fowl), add enough cold water so it covers the contents.  Place the pot on the stove and slowly let it come to a gentle simmer -- *NOT* a boil.  As it bubbles, a foamy substance will rise to the surface.  With a spoon, carefully skim it off and discard the scum.  Those are the impurities (blood, fat, etc.) in the bird that you do not want in your stock, that will make it cloudy instead of clear.  Do not stir, just slowly skim.  This may take a while and a little patience, but stay strong!  

Once the abundance of foaminess subsides, add your aromatics.  My preferred mix, generally speaking, is onion, carrots, celery, garlic, parsley, additional herbs (thyme, sage, oregano, chervil, rosemary ... really anything), bay leaves (like 2 max), cloves (maybe like 10), peppercorns (maybe like 10), mushroom remnants work well if I have them, ginger.... Again, it's not a recipe; it's leftover stuff in my fridge.  Also keep in mind that stock is a base for a dish you will use it in, so don't worry about seasoning it or adding too many flavors; keep it simple.  

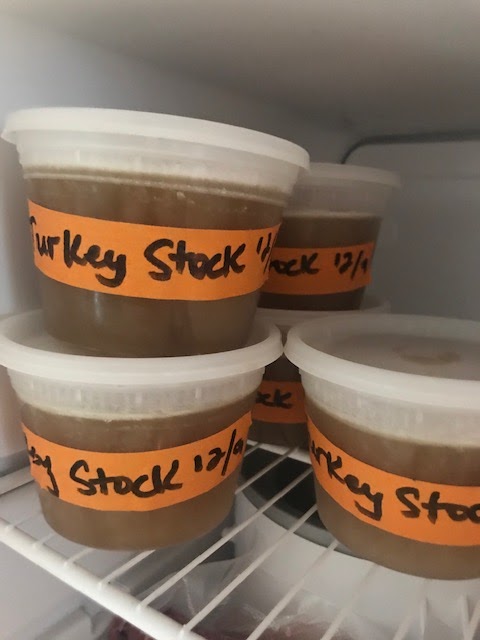
After that, just keep the stock at a very low simmer, skimming the scum as needed.  Let it go for 6-8 hours, replenishing the liquid as needed.  Honestly, it just sits there filling your home with a potpourri of homemade wonder.  My Thanksgiving turkey this year alone produced two perfect gallons of stock, which I transferred to 2-cup containers that are stored in my freezer. While the cooking time may seem trepidatious, trust me when I say it is worth the effort.  It just sits on the stove while you watch TV.  


Following it's stint on the stove, you will need to strain it.  I use a kitchen accessory called a chinois so I can press the solids through it in order to extract the juices.  However, you can use a regular strainer, lined with a couple layers of cheesecloth if you want.  If you use a strainer NOT lined with cheesecloth, do not press the solids because you do not want chunks in your stock.  


Ideally, one would want to put the vessel used to strain the liquid into, into an ice water bath so it cools quickly.  When I do this at home, I wait for the stock to cool a little and then divide it into smaller containers (2-cup is my preference).  Once it stops steaming, I put lids on and, labeled and dated, it goes in the freezer to be thawed as needed.  

Additionally, it can be stored in the fridge if used within 5 days. However, one may notice that when taken out, it will look like jello.  This is a good thing!  When the bones cook for that long, the gelatin breaks down and releases itself into the liquid.  That is a a good sign.  When heated, it will melt and become liquid again.  Think of it as "bone butter".  

In conclusion, there are so many benefits to making stock at home.  First, it saves money.  I have 2 gallons of stock from one turkey for basically free.  How much does a good quality stock cost at the store?  I'm not talking about the bargain brand ones, with the laundry list of mystery ingredients -- the good ones.  Maybe $4.00 a quart?  Secondly, there's no packaging waste.  Lastly, ingredients that may simply have been discarded are being utilized for another purpose.  Save the carcass and enjoy!

Saturday, September 28, 2019

Love What You Do; Do What You Love

These are my kitchen shoes.  That's what they looked like brand new.  Currently they are stained here and there with various food products.  "Work clean" they say.  Somehow, it's always a messy job.

After almost a decade of cooking for people privately, I decided to take on the job of "prep cook" in a hotel kitchen.  There is a coffee shop that sells things like granola yogurt parfaits, breakfast sandwiches & burritos, various salads, sandwiches, etc.  That's what I do for the first part of my day.  After I am finished with that, I prep for the next day making sure I have enough eggs, sliced meats & cheeses, breakfast burrito mix, soft cooked eggs .... It's pretty easy stuff.

Nonetheless, from the moment I walk into the kitchen until the time I leave, my brain and my body does not stop working.  There is not one second of idleness.  What I do is low on the totem pole, but I put my heart and soul into what I do.  Planning 2 steps ahead and not wasting movements in the kitchen is key.  You focus, you run, you go non-stop.  As you perform your job, you try as hard as you can to not injure others in the process.   "KNIFE!"  "HOT PAN!"  "CORNER!"  "BEHIND!"  "COMING THROUGH!"  At the same time, people are shuffling around you with hot pans and knives.  There are things that fall on the floor that may cause you to slip.  It's an orchestra.  And there is a constant mind f*ck of how one can be faster or cleaner or better in general.  In the kitchen, there is no such thing as perfect.

On top of that, I move as quickly as I can so I can help my chefs with prep and learn from them.  The sooner I finish my tasks for the coffee shop, the sooner I can be with them.  The best part of my day is spent learning.

In conclusion, I am truly dedicated to and extremely proud of what I do.  When I come home, I am more tired than I have ever been in my life. My entire body aches -- head to toe.  However, no matter how much my body is relenting, my heart is always screaming "WOW THAT WAS AWESOME!"


Wednesday, March 20, 2019

Trudy's Pierogi With Kraut From Sts. Peter & Paul in Detroit


My boyfriend gave me a cookbook that was his mother's called "Wildlife Chef".  Tucked inside was a yellowed piece of paper, very neatly folded into thirds.  Written in his grandmother's beautifully meticulous cursive handwriting was this recipe.  Of course, I had to make it!  And it was wonderful.  


For the Kraut:

1 large jar of kraut
1 onion, sliced
1 tablespoon butter
1 tablespoon oil
Salt & pepper, to taste

Drain juice from kraut.  Put in boiling water for 5 minutes.  Drain in a colander under cool water.  Squeeze dry. 

In a fry pan, melt butter and add oil.  Sauté onion, and cook over medium heat until a little caramelized. 

Put kraut in frying pan with sautéed onion.  Add salt & pepper to taste.  Cook until a little brown. 

(Filling for pierogi, or can be served as a side dish)

For the Pierogi:

2 cups flour
½ cup warm milk
1 whole egg + 1 yolk
2 tablespoons sour cream
½ teaspoon salt
1 tablespoon butter for richer dough (optional)

Mix ingredients and knead into a soft, pliable dough.  Let rest for 10 minutes covered with a warm bowl. 

Divide dough into halves and roll thin.  Cut circles with large biscuit cutter. 

Place a small spoonful of filling a little to one side.  Moisten edge with water.  Fold over and press edges together firmly.  Be sure they are well sealed to prevent the filling from running out. 

Drop pierogi into salted, boiling water.  Cook for 5 minutes.  Lift out of water carefully with a slotted spoon.

Serve with melted butter. 

*********
Beth's note:
When I make pierogi, I melt butter in a fry pan, then add the boiled pierogi to the butter.  Cook on one side until they are browned, then flip and fry the second side.  I like to serve them with a dollop of sour cream.  

Also, if you are not eating them all right away, place on a cookie sheet lined with waxed paper or parchment paper dusted with flour.  Put in the freezer until well frozen and stash in a large ziplock bag.  They will keep for at least a month.